


Any water day
is a fun day
Check out the collection of activities that include making observations with sight, smell, hearing, touch, and taste.
Water play is a perfect outdoor activity for babies and toddlers on warm summer days. Add materials gathered in nature to a simple sink or float activity to provide some awesome hands on learning and sensory play
Exploring Absorption of Liquids
and Moving Liquids
Discovering Sponges through Water Play
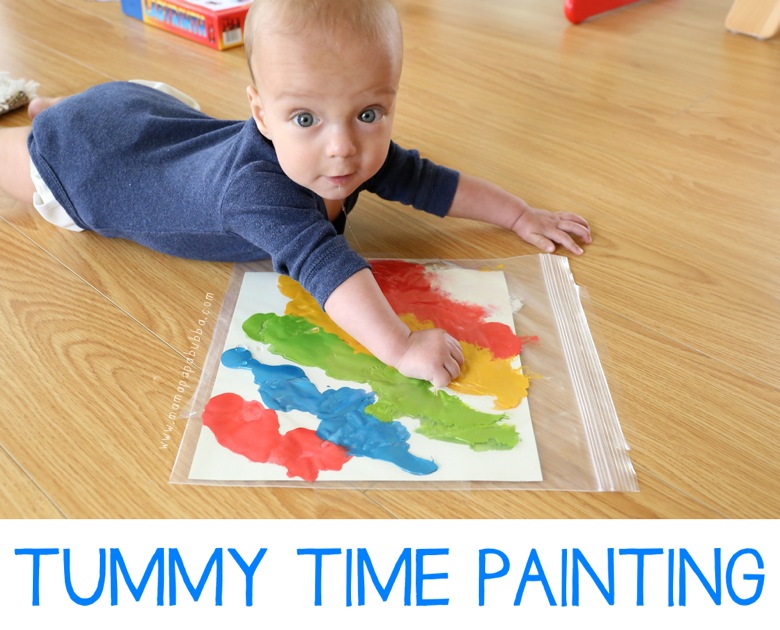
Whenever Buddy and I have fun with a messy activity, I like to have a water activity set up too. This naturally extends our play time and it means I get him cleaned up without any protest – that’s a bonus on both counts!
After we had fun with our paper plate painting with edible paint Buddy enjoyed discovering sponges in his water tub.
Setting It Up
Obviously it requires a bit more preparation to set up two plays at once, however I find it reduces tears and tantrums when the messy play is over and the clean up operation begins.

This one was beautifully simple to set up as we played in the wet room. We don’t have a bath in our house and the bucket he is playing with is actually his bath tub. Fortunately he loves bath time so he is always happy to play with his tub.
I set the tub up with a variety of household sponges in the corner of the room. Buddy didn’t even notice it until he grew bored with painting and began to explore other things in the room.
Play!
Buddy was excited to see his bathtub filled with objects. He cracked out a huge smile and plunged straight in.

As expected he fished out the cow sponge. He loves chewing it, engorging it with water and trying to drink it, waving it…. The list is endless.


He played with it for a good while before (finally) looking into the tub again. This time he located the big shower puff sponge.


He spent some time flapping it about and pulling at the netting. He has never touched this sponge before so it was fun to see him investigate it.


He got soaking wet playing with the sponges but really enjoyed it!
Next I popped him in the tub to scrub up and to explore the other sponges. He enjoyed chewing on the scouring sponge, I think it felt nice against his sore gums.


He enjoyed touching the scouring pad and spent time scratching his nails through it. He seemed pretty impressed by the noise it made.

He then had a good poke at all of the cloths and sponges and enjoyed splashing them in the water, cleaning himself in the process!
This was a really fun way to clean up from an exciting messy play. Buddy had fun and we avoided all melt downs! Now I’m just biding my time until he can help me clean up the mess we make too!
Have I convinced you that sponges need to be in your chilrens toy box? They are also featured as blocks in the STEAM construction and Building page. I just love their versatality. Let me continue...
Sponges as Loose Parts in the Playroom
Pick up a package of colourful dollar store sponges to add to your collection of loose parts in the playroom. Here, I’ll tell you all the creative ways my littles explored and played with ours in a mere half hour the other day.
“Children learn as they play. Most importantly, in play children learn how to learn.” – Fred Donaldson
This is just a short, little post with an important message: Never underestimate the potential for play that even the simplest of items provide.
SPONGES AS LOOSE PARTS
My husband came home from grocery shopping the other day, and tossed me a sleeve of brightly coloured kitchen sponges, and said “I picked these up for a dollar. I thought you and the hooligans might be able to use them for something”. He’s such a great guy. 🙂

My wheels started turning, thinking about all of the things we could do with them, but it was getting late in the day and there wasn’t enough time left to start a craft or to use our sponges for an art project.
I put the sponges in basket and simply presented them to the kids that way to see what they would do with them.
OOOOH, AAAAH…
First of all, you should have heard the squeals of delight and the ooohs and ahhhhs, when I placed the basket on a table in the playroom. You’d have thought the basket was filled with candy.
It’s so great when kids get excited over the simple things.There was no question that THEY could see the possibilities that this basket held.
LOOSE PARTS ENCOURAGE IMAGINATION AND CREATIVITY
That’s the beauty of “loose parts” for play. Open-ended items that have no pre-defined purpose opens the door for all kinds of creative and imaginative play, which won’t happen nearly enough with toys that are “meant” to be played with in a certain way.
All hands were scrambling to grab as many as they could, and the basket was quickly emptied, and they headed off to do what they do best.

For the next half hour, until they children went home, these sponges were the main attraction. Each child played with them in their own way.
I took a few photos to show you how they were being used.
CREATIVE EXPLORATION
They were the key pieces in a construction site here.

ENGINEERING
Someone used them as building blocks to build a tower.

IMAGINATION
They became beds for the animals.

PROBLEM SOLVING
The kids used them as obstacles to drive their toy cars around.

SENSORY AND VOCABULARY
There was also pretend scrubbing of toys happening, which I didn’t photograph, and they each rubbed their hands and faces with the sponges, describing the scouring side as “scratchy and rough” and the soft side as “squishy”.
CRITICAL THINKING
The sponges even encouraged some critical thinking: at the end of the day, before the the last child left, she tucked all of the sponges into the doll house. Notice how she arranged each sponge with the thin scouring surface facing to the right.

Who would have thought a little sleeve of coloured sponges would present so many opportunities for learning and imaginative play.

I’m sure we’ll eventually use these sponges for various arts and craft projects. but for now, I think we’ll just keep them in the toy room, and enjoy the open-ended play possibilities they provide.
Sensory Science Bottles with Water

Our Nature Sorting Sensory Bottles is just one example of a wonderful visual and tactile learning experience

Important vocabulary related to nature sorting
Leaf
Flower
Plant
Gather
Collect
Color
Feel
Let’s count!
Bottle


What you need for sensory bottles:
Voss water bottles – they are so pretty, and the label peels off easily compared to other bottles! However, any clear recycled bottle will work.
Leaves, flowers, plants
Water
Optional: Adhesive remover – there was very little sticky residue on our Voss water bottles, so we skipped this step. However, I have found other water brand labels to be more difficult to remove and require adhesive remover.
How to set up the sorting bottles activity:
Remove labels from bottle; wash and dry bottle
Place one type of leaf in each bottle
Arrange other leaves in piles for younger toddlers; older children may enjoy a challenge by mixing the leaves together!
Insert leaves to matching bottle
Add water
Close lid tightly
Let your child shake and observe!

Nature sensory bottle teaching tips:
Show your child how you carefully handle each leaf
Let your child explore quietly without interruptions
When the opportunity arises, ask him or her what she sees, feels, smells, and hears!

Our observations from our nature sorting sensory bottles
Over the course of the day, some of the leaves in the sensory bottles may change the color of the water!
I wish I had a photo of the beautiful amber color that developed from the reddish leaves!
Why You will Want a Water Table (and 10 creative ways to use one!)

Those of you who are familiar with my blog are no stranger's to Brandons fantastic expressions. A few weeks back the Seattle weather, normally rainy until JULY, gave us a little summer teaser and baby X got his first experience with our water table. The photos were just too good to not share, so I thought I'd write a little post about why we love water tables.
For those of you with water tables already, there are TEN creative ideas for how to use them at the end of the post. :)

Brandon loves water. LOVES it. And water is really one of the best (and free!) sensory materials ever. There's warm water, cold water, ice - so many ideas and ways to play using just water. For the littlest guys, water tables are a great way to practice standing and cruising and splashing.

You can introduce fine motor practice by placing items in the water table for grabbing (please note the items pictured are not baby toys, and do pose a choking hazard - Brandon has an older sister and is always supervised and an adult is always within arms' reach).

As Brandon illustrates here - water tables are just THE COOLEST. We bought our first water table when S was 10 months old and we've used it constantly ever since. As X gets older, he'll begin to use the water table to practice scooping and pouring like his big sister does now.

Honestly my kids really enjoy a water table with, well, water, but you can spice it up a bit if you are so inclined. And for those of you with long winters like us here in Seattle, a cleaned/dried water table makes a fantastic indoor sensory table during the colder months (you could fill it with sand, moon sand, birdseed, dried beans - the possibilities are nearly endless!).

For those of you who already have a water table or for those of you who will soon have one, here are ten fun ways to use your water table this summer:
Add some soap and set up a Washing Station like ours.

Make a fun outdoor Penguin World that also helps you practice counting like Thrive 360 Living

Make a Dinosaur Sensory Bin like Fantastic Fun and Learning

Do some Sensory Tub Painting like No Time for Flashcards

Add in some letter practice and make Alphabet Soup like My Nearest and Dearest

Explore colors with Colored Ice like Fun-a-Day

Create a Spring Sensory Table like The Pleasantest Thing

Create an Ocean Sensory Tub like No Time for Flashcards

Set up a Marshmallow Sensory Play like Fantastic Fun and Learning

Have some Fizzy Fun like My Nearest and Dearest

You can incorporate all sorts of learning activity into water play such as fine motor, scooping and pouring, color mixing, counting, etc.
It’s fun, sometimes messy, and can be done inside and out!
Are you ready to have some fun?

Water Sensory Bins
Get out the rubber duckies for this fun Pond Sensory Bin from In Our Pond.
Add lemons to the water for a fun Lemon Sensory Bin from Fantastic Fun and Learning.
Play with letters in water with this fun Alphabet Sensory Bin from Teaching 2 and 3 Year Olds. These awesome letters and numbers from Little Tikes are perfect for using with water!
Combine flower petals with water for this Flower Petal Sensory Play idea from Fantastic Fun and Learning.

Add some sharks to water for this fun Shark Sensory Bin from Mommy’s Bundle.
Have fun scooping with this fun and simple Scooping Blocks Sensory Bin from My Bored Toddler.
Play with sand and water with this fun Ocean Sensory Bin from Fun Learning for Kids.
Practice sorting colors with this fun Color Sorting Water Bin from Teaching 2 and 3 Year Olds.
Large plastic bins are perfect to use for indoor water play. Try a plastic underbed storage bin. It’s shallow, for easy access and has a lid so an adult can move it with minimal mess. Put a large beach towel underneath to soak up any spills.

Outdoor Water Fun
Have fun painting with water with this low-mess and super-fun outdoor activity from Mama Smiles.
Get out the hose and spray at targets with this fun idea from Busy Toddler.
Water the alphabet flowers with this fun driveway activity from Fun Learning for Kids.

Get out the water sprinklers and have some fun using these tips from Rhythms of Play.
Throw some fun Sponge Water Bombs with this fun idea from Messy Little Monster.
Paint your driveway with water with this fun idea from Hands On As We Grow.
An outdoor water table is a great investment for water play. You can choose a simple water table or a fun, themed water table like this pirate ship.

Seashell Beach Sensory Bin

Water is a must-have over the summer. Grab a bunch of seashells from the beach (or at the dollar store) and make a fun sensory bin by adding water, a few drops of food coloring, and the seashells. The bigger the seashells, the better little learners who are still working on grasping can have an easier time holding the shells.
Car Wash

One simple activity to set up is a toy wash sensory bin (example: cars or unicorns). Grab a few toy cars, a brush, and some soapy water. I always use baby shampoo to be safe in case he puts the soap in his eyes.
Baby bath soap creates more bubbles. Add a lot of water to the bin as little learners will love to hide the toys and their own hands under the water.
Water Transfer
A Crafty LIVing on Instagram: “"SQUEEEEEZE!" dinner prep + busy toddler!
Simple & inexpensive water transfer Toddler activity!
Susie Allison | Busy Toddler
Using two bins, add water in one bin and a set of sponges. Show your one year old how to transfer water from one bin to the next squeezing the sponges.
Pool Noodle Boats

Have Fun With These 35 Cool Pool Noodle Crafts
The Spruce Crafts
DIY Pool Noodle Boats- Super fun water activity for the kiddos this summer. Inexpensive and super easy to make. Find all items at the Dollar Store.
You can get a pool noodle at the dollar store and cut it in pieces; then, the possibilities are endless with these foams. You can make pool noddle boats, and use them with a net to fish them out, stack them, take them to the beach or even add them to a water table.
Painting With Ice

Painting with ice is one of my all-time favorite activities. On a hot summer day, they will lick the popsicle, get hydrated, and have fun! I like to use popsicle molds because it creates an easy handle. Another way to do the ice paintbrushes is with a regular ice cube tray and wood popsicle sticks. To make the ice paintbrushes add some food coloring to an ice tray and fill with water. Freeze for 24 hours. Unmold and provide some craft paper or white sheet and pain as the ice melts away.
Paint With Water

35+ Brilliant sensory bins for Babies -
Kid Activities with Alexa
Kid Activities with Alexa
There are different options for doing this activity. Inside, you can grab construction paper, a paintbrush, and a cup of water. Dip the paintbrush in the water and paint away over the paper! Want to do this outside? Grab large paintbrushes and a bucket of water and paint the fence, the street, the sidewalk. You can even draw with chalk first and then erase it!
Water And Sand Sensory Table

How to Make a PVC Pipe Sand and Water Table - Frugal Fun For Boys and Girls
I saw this and I immediately told my husband I wanted him to build a water and sand table. We use an old bin and some leftover PVC pipes he had from an old project plus some funnels from the dollar store. Kids love to see water and sand move, provide strainers and funnels to encourage pouring and movement.
Frozen Nature Blocks

Nature Soup: A Mess Free Sensory Bin for Toddlers and Kids - Happily Ever Mom
Happily Ever Mom
Another great option when your little one still puts everything in his/her mouth is to create giant blocks of ice with things inside. You can add toys, flowers, pom-poms, basically anything you can fit into a container and add water. if you are going to use flowers, make the collecting of the flowers as part of the activity as we did for our Mother’s Day Craft, go on a nature walk and collect the flowers, freeze them, and then use warm water to melt the ice.
Sponge Balls

How to Make a Sponge Ball for Awesome Summer Water Games - Fun Loving Families
Fun Loving Families
How to Make a Sponge Ball for Awesome Summer Water Games - Fun Loving Families
My son can play in the water all day every day, and after a while, things can get repetitive. Cut sponges un stripes and tie them tight in the middle to create a sponge ball. These are fun to add to bath time or a fun ball pit activity this summer.
Rainbow Foam

The rainbow foam was one of the first sensory activities that I did at home. I used a different recipe that asked for flour to make the foam thicker and extra fluffy, oh, and it asked to use dish soap. What I didn’t realize is that for a One Year Old, this was a BAD idea… He touched his face, he tried to wipe it, and foam was everywhere, his eye stung, and he was crying a lot. Learn from me, go simple, use baby soap instead. Just add some baby soap, food coloring, and water into the blender and create a fun foam tray. It is safe for the eyes, and it’s like a free fun bath! Don’t want to do it outside? Do it in the bathtub and then just rinse it away.
Ocean Sensory Bag
Sensory bags are another great way to share activities without having to worry about little ones putting the items in their mouth. Add water or hair gel inside a gallon sizes zip lock bag and a few ocean animals. Tape the bag to the floor so that they don’t try to eat the bag too!

Beach and Ocean Sensory Squish Bags - Fantastic Fun & Learning
Beach and Ocean Sensory Squish Bags - Fantastic Fun & Learning
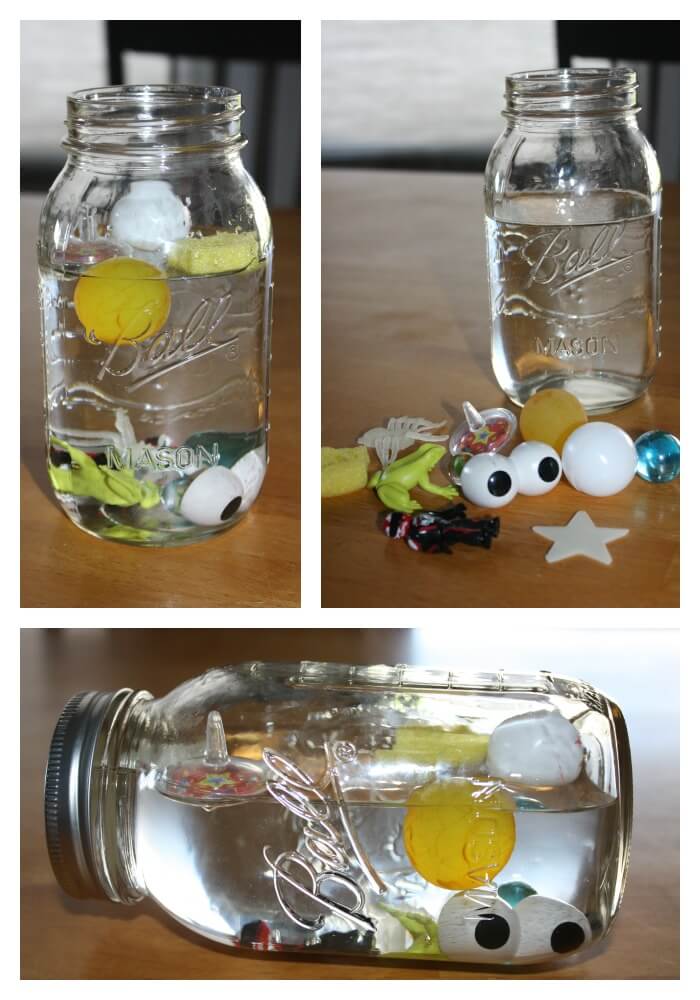
Ocean Sensory Bottle
Sensory bottles are a lot of fun. For a mess-free activity, create an ocean themes sensory bottle by adding a shark made out of foam sheet into a VOSS bottle. Add glitter and a 1/4 cup of soap. Sensory bottle tutorial


